In my previous blog post VMware View & NetApp Performance Assessment using LoginVSI - Part 1 – Setup I shared some suggestions and links to Login VSI documentation which helped me in setting up Login VSI. If you were able to complete all the steps successfully, you would have completed the following:
Pre-Checks for Test Setup
- VSISHARE
A Windows 2008 R2 VM with a shared folder configured where Dataserver Setup was installed. The UNC path of the share should be \\VSISHARE\VSISHARE which would contain the following:

- Active Directory User Accounts & Groups
If you have used the PowerShell script from AD Setup wizard then the following user OU and User accounts would have been created
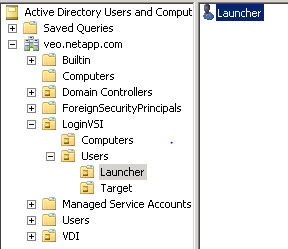
- Launcher
A Windows 2008 R2 VM is being used as a Launcher. Ensure that you can perform the following:
- RDP to this Launcher VM using the Launcher-v4 username created by the PowerShell script.
- Access the VSISHARE using \\VSISHARE\VSISHARE
- Target
A Windows 7 VM is setup and joined to the domain. Make sure that you installed Target Setup from the LoginVSI installer. Ensure that you can perform the following:
- RDP to this Launcher VM using the LoginVSI-X username created by the PowerShell script.
- Access the VSISHARE using \\VSISHARE\VSISHARE
- VMware View
I have not discussed this in my previous blog but it’s mandatory to have a View environment setup. In my case I have created an Automated Linked Clone pool with dedicated user assignment. It’s very important that you entitle this pool with the LoginVSI Group. With the entitlement LoginVSI users can login to the desktops in the pool.

Creating a Test Setup - Scenario
The above pre-checks will help you in avoiding any issues while executing the test.
Here is screenshot of the test setup options that I have used.
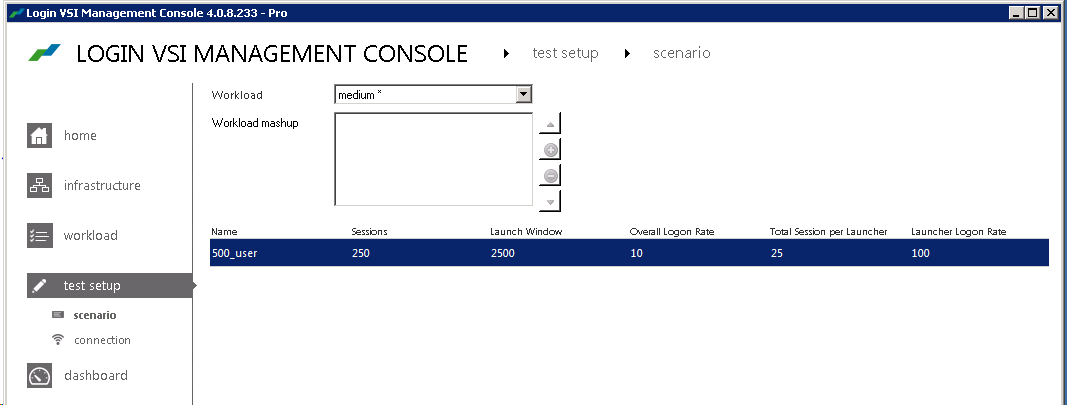
I will highlight the important options
- Workload – Depending on your requirement chose the available options for workload. In my setup I chose medium.
- Name – Any descriptive name
- Sessions – The number of user sessions that you want to test. In my case I chose the 250.
- Launch Window & Overall Logon Rate – In the Overall Logon Rate you define the logon rate for each session. In this case I chose 10 seconds for each session (assuming that it takes 10 seconds for each VM to boot) hence to logon all 250 session it would take 250 x 10 = 2500 i.e. the Launch Window.
- Total Session Per Launcher – The number of sessions are equally divided among the launcher. Note that you cannot have more than 50 user sessions per launcher hence you have to add the Launchers accordingly.
Additional documentation about creating a scenario and BasePhase configuration is available at the following link http://www.loginvsi.com/documentation/index.php?title=Installation#Creating_a_scenario
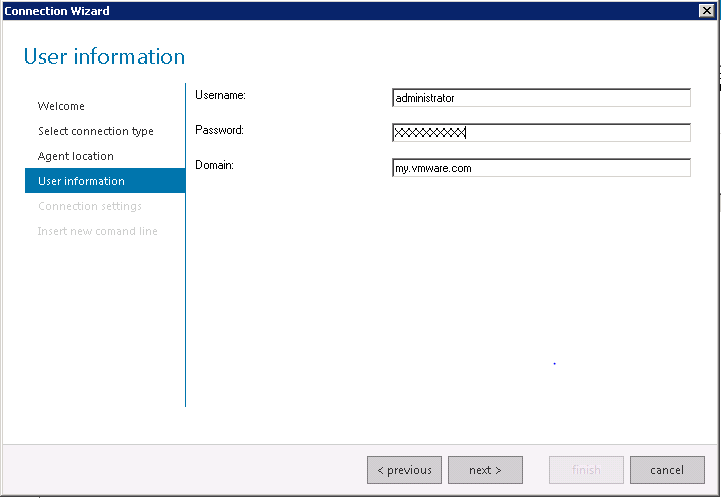
Creating a Test Setup - Configure Connection for VMware View
In this section we will provide the VMware View Infrastructure details that would be used by Login VSI.
- From the Management Console home tab, click on Create Connection and then click on Start Connection Wizard.
- Select VMware View as connection type

- Use the default location for the View Agent path
C:\Program Files\VMware\VMware View\Client\bin\wswc.exe
- Provide the credentials which is used to login to View Manager Administrator portal. Yes, you have to type the password in plain text.
- In the next screen provide the IP/FQDN of the connection server. In Desktop name type the Linked Clone pool name.

- As per the inputs that have been provided, LoginVSI summarizes this in the following command. This is also the command that would be executed from each Launcher VM. To test the command you can execute the following command from a Launcher VM (you have to enter the details in plain text for e.g. server, username, password, domain).
"C:\Program Files\VMware\VMware View\Client\bin\wswc.exe" -serverURL {server} -username {username} -password {password} -domainName {domain} -desktopName pool_1 -standAlone -logInAsCurrentUser False –nonInteractive
IMPORTANT: Using the default LoginVSI options, Active Sessions won’t start. For Active Sessions to be initiated you have to add –unattended option to the above command line. Hence the revised command line would be
"C:\Program Files\VMware\VMware View\Client\bin\wswc.exe" -serverURL {server} -username {username} -password {password} -domainName {domain} -desktopName pool_1 -standAlone -logInAsCurrentUser False –nonInteractive
After creating a Test Scenario and Configuring Connection, you are now ready to start the test. I will discuss this in the next blog post and will post the link on @arunpande when the blog post is ready.