Thursday, January 30, 2014

Migrate (Storage) VMware View VMs using Volume Move WITHOUT DOWNTIME on NetApp Clustered Data ONTAP

Welcome: To stay updated with all my Blog posts follow me on Twitter @arunpande !


In one of my blog posts Perform Storage Maintenance on NetApp Clustered Data ONTAP with ZERO downtime, I have shared about performing non-disruptive Storage maintenance using Storage Failover feature with NetApp Clustered Data ONTAP. In this blog post I will cover scenarios where the following maintenance has to be performed?
  • Perform upgrade on the disk shelves.
  • Perform maintenance on the disk shelves for e.g. replacing the disk drives or updating the firmware.


Assuming that you have to perform the above maintenance tasks during business hours and you have a VMware View Linked Clone pool provisioned, how would you deal with this?
Though the task is complex but the solution is easy with Volume Move feature in NetApp Clustered Data ONTAP.
To demonstrate this, I have setup a lab with 125 View Desktops provisioned NFS volume “nfs3_1tb_aggr01”which is located on the disk shelf attached to one of the FAS3240 nodes. I have two FAS 3240 nodes configured in HA pair.
 
Assuming that you have to perform some offline maintenance tasks on the underlying aggregate or disk shelf where “nfs3_1tb_aggr01” resides. How would you deal with this situation? especially when the business cannot afford downtime.


As a Storage or VMware View Administrator you have the following options to relocate the 125 View Desktops from aggr01 to another aggregate on another disk shelf which is connected to the HA pair:


Request the View Desktop users to log off AND Rebalance by VMware View – In this option you would have to take into account the down time required to complete the Rebalance task. NOTE: VMware View Rebalance would not log off all users at once, it would do that in a batch of 12 View Desktops.


Non-Disruptively relocate the VMs from aggreagate01 to aggregate02 using Volume Move by NetApp Clustered Data ONTAP.


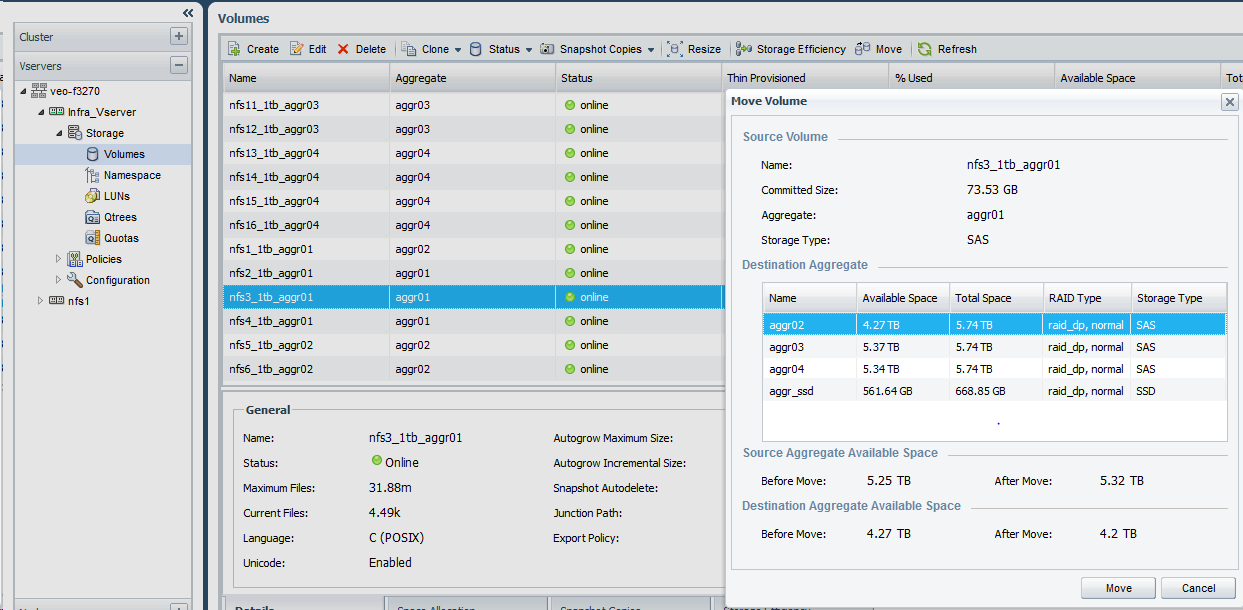
To avoid any downtime, I chose Volume Move to migrate the View Desktops to a different aggregate on another disk shelf.


The process to move a volume is simple to perform. If you are connected to the NetApp OnCommand System Manager, select the Volume > click Move > chose the Destination Aggregate.


Alternatively, you may also use ONTAP CLI to perform Volume Move
# volume move start -vserver Infra_Vserver -volume nfs3_1tb_aggr01 -destination-aggregate aggr02 -cutover-window 45


You may also check the statistics of the volume move task using the following command.
lab-f3270::> volume move show -vserver Infra_Vserver -volume nfs3_1tb_aggr01


                     Vserver Name: Infra_Vserver
                      Volume Name: nfs3_1tb_aggr01
           Actual Completion Time: Wed Jan 29 13:26:49 2014
     Specified Action For Cutover: defer_on_failure
       Specified Cutover Attempts: 3
    Specified Cutover Time Window: 45
      Time User Triggered Cutover: -
Time Move Job Last Entered Cutover: Wed Jan 29 13:26:15 2014
            Destination Aggregate: aggr02
                  Detailed Status: Successful
     Estimated Time of Completion: -
                    Managing Node: veo-filer1
              Percentage Complete: 100%
                       Move Phase: completed
     Estimated Remaining Duration: -
           Replication Throughput: 196.0MB/s
                 Duration of Move: 00:07:21.000
                 Source Aggregate: aggr01
               Start Time of Move: Wed Jan 29 13:19:28 2014
                       Move State: done


IMPORTANT:
Consider the following points before attempting volume move to ensure successful completion.
  • Committed Size – The amount of data that needs to be copied.
  • Incoming I/O Rate – The amount of active I/O during the volume move process.
  • Throughput – The data transfer is done on the cluster network. The throughput would depend on the bandwidth available on this network.


For detailed information and best practices about Volume Move, please refer to TR 4074 - DataMotion for Volumes Best Practices and Optimization System Operating in Cluster-Mode.

Friday, January 24, 2014

Perform Storage Maintenance on NetApp Clustered Data ONTAP with ZERO downtime

Welcome: To stay updated with all my Blog posts follow me on Twitter @arunpande !


I am writing this blog to share my experience about scheduling a maintenance activity on NetApp FAS3270 with Clustered DATA ONTAP. I had to reboot one node which was hosting 500 virtual machines across eight ESXi hosts.                                                                                                                                                                                                                                                          


When a storage administrator has to schedule a maintenance activity like firmware/hardware upgrade which requires a reboot he has the following options:


Work hard with Traditional Storage
  • Spend several minutes trying to shutdown the VMs on all eight ESXi hosts.
  • Make sure all VMs are powered off and there is no active I/O to avoid any application specific issues.
  • Reboot the Controller.
  • Again spend several hours trying to power on all the 500 virtual machines.
  • Spend hours working on your weekend trying to complete this maintenance


Work Smart with Clustered Data ONTAP
  • Use Clustered Data ONTAP with LIF migration and SFO (Storage Failover).
  • Perform takeover/give back of the controller.
  • No changes required in the vSphere Infrastrucutre
  • Migrate the LIFs back to the source node
  • Complete the maintenance within 10-15 minutes during production hours.


This is the procedure that I followed to perform this activity


I have the following cluster configured with 515 VMs


IMPORTANT: You don’t have to make any changes in your vSphere Infrastructure. You do NOT need any downtime for VMs.


The following activity has to be performed on your NetApp Storage


Make sure that the cluster is healthy.
f3270::> cluster show
Node                  Health  Eligibility
--------------------- ------- ------------
lab-filer1            true    true
lab-filer2            true    true
lab-filer3            true    true
lab-filer4            true    true
4 entries were displayed.


Check the Storage Failover settings
lab-f3270::> storage failover show
                             Takeover
Node           Partner        Possible State Description
-------------- -------------- -------- -------------------------------------
lab-filer1     lab-filer2     true     Connected to lab-filer2
lab-filer2     lab-filer1     true     Connected to lab-filer1
lab-filer3     lab-filer4     true     Connected to lab-filer4
lab-filer4     lab-filer3     true     Connected to lab-filer3
4 entries were displayed.


Enable Advanced mode
lab-f3270::> set adv


Warning: These advanced commands are potentially dangerous; use them only when directed to do so by NetApp personnel.
Do you want to continue? {y|n}: y


Check how many lifs are currently on this node
lab-f3270::*> network interface show -data-protocol nfs|iscsi|fcp -curr-node lab-filer4
           Logical    Status     Network            Current       Current Is
Vserver     Interface  Admin/Oper Address/Mask       Node          Port    Home
----------- ---------- ---------- ------------------ ------------- ------- ----
Lab_Vserver
           nfs_lif04    up/up    192.168.40.244/24  lab-filer4    i0a-400 true


Make sure that the LIF is migrated to another node in the cluster
lab-f3270::*> network interface migrate-all -node lab-filer4


lab-f3270::*> network interface show -data-protocol nfs|iscsi|fcp -curr-node lab-filer4
There are no entries matching your query.


IMPORTANT: Create LIF Failover groups to perform seamless migration of the LIFs during link failure and takeover. In this blog post I have shared the steps to perform link migration in case you have not configured Failover groups. I encourage that you configure failover groups, refer to the Clustered Data ONTAP ® 8.2 High-Availability Configuration Guide for detailed information.


Initiate the takeover of the controller to reboot it.
lab-f3270::*> storage failover takeover -ofnode lab-filer4


The controller now reboots
lab-filer4% Waiting for PIDS: /usr/sbin/ypbind 722.
Waiting for PIDS: /usr/sbin/rpcbind 688.
Terminated
.
Uptime: 112d2h54m45s
Top Shutdown Times (ms): {if_reset=1161, shutdown_wafl=223(multivol=0, sfsr=0, abort_scan=0, snapshot=0, start=62, sync1=77, sync2=4, mark_fs=80), wafl_sync_tagged=148, shutdown_raid=28, iscsimgt_notify_shutdown_appliance=22, shutdown_fm=15}
Shutdown duration (ms): {CIFS=2607, NFS=2607, ISCSI=2585, FCP=2585}
HALT:  HA partner has taken over (ic) on Fri Jan 24 04:08:38 EST 2014


System rebooting...


Once the reboot is complete and the storage is ready for give back, initiate the give back for this controller
lab-f3270::*> storage failover giveback -ofnode lab-filer4


Info: Run the storage failover show-giveback command to check giveback status.


Revert the lif back to its home node
lab-f3270::*> network interface revert -vserver Lab_Vserver -lif nfs_lif04


lab-f3270::*> network interface show -data-protocol nfs|iscsi|fcp -curr-node lab-filer4
           Logical    Status     Network            Current       Current Is
Vserver     Interface  Admin/Oper Address/Mask       Node          Port    Home
----------- ---------- ---------- ------------------ ------------- ------- ----
Lab_Vserver
           nfs_lif04    up/up    192.168.40.244/24  lab-filer4    i0a-400 true


Make sure that the cluster is healthy again. 

Within 10-15 minutes and the entire maintenance activity of rebooting the controller and making sure that its online was complete.


IMPORTANT: It’s important that you setup the cluster as per best practices, refer to Clustered Data ONTAP 8.2 Documentation for more information.


Friday, January 10, 2014

VMware View & NetApp Performance Assessment using LoginVSI - Part 2 – Test Setup.

Welcome: To stay updated with all my Blog posts follow me on Twitter @arunpande !

In my previous blog post VMware View & NetApp Performance Assessment using LoginVSI - Part 1 – Setup I shared some suggestions and links to Login VSI documentation which helped me in setting up Login VSI. If you were able to complete all the steps successfully, you would have completed the following:


Pre-Checks for Test Setup


  • VSISHARE
A Windows 2008 R2 VM with a shared folder configured where Dataserver Setup was installed. The UNC path of the share should be \\VSISHARE\VSISHARE which would contain the following:


  • Active Directory User Accounts & Groups
If you have used the PowerShell script from AD Setup wizard then the following user OU and User accounts would have been created


  • Launcher
A Windows 2008 R2 VM is being used as a Launcher. Ensure that you can perform the following:
    • RDP to this Launcher VM using the Launcher-v4 username created by the PowerShell script.
    • Access the VSISHARE using \\VSISHARE\VSISHARE


  • Target
A Windows 7 VM is setup and joined to the domain. Make sure that you installed Target Setup from the LoginVSI installer. Ensure that you can perform the following:
    • RDP to this Launcher VM using the LoginVSI-X username created by the PowerShell script.
    • Access the VSISHARE using \\VSISHARE\VSISHARE


  • VMware View
I have not discussed this in my previous blog but it’s mandatory to have a View environment setup. In my case I have created an Automated Linked Clone pool with dedicated user assignment. It’s very important that you entitle this pool with the LoginVSI Group. With the entitlement LoginVSI users can login to the desktops in the pool.


Creating a Test Setup - Scenario


The above pre-checks will help you in avoiding any issues while executing the test.
 Here is screenshot of the test setup options that I have used.


I will highlight the important options

    • Workload – Depending on your requirement chose the available options for workload. In my setup I chose medium.
    • Name – Any descriptive name
    • Sessions – The number of user sessions that you want to test. In my case I chose the 250.
    • Launch Window & Overall Logon Rate – In the Overall Logon Rate you define the logon rate for each session. In this case I chose 10 seconds for each session (assuming that it takes 10 seconds for each VM to boot) hence to logon all 250 session it would take 250 x 10 = 2500 i.e. the Launch Window.
    • Total Session Per Launcher – The number of sessions are equally divided among the launcher. Note that you cannot have more than 50 user sessions per launcher hence you have to add the Launchers accordingly.


Additional documentation about creating a scenario and BasePhase configuration is available at the following link http://www.loginvsi.com/documentation/index.php?title=Installation#Creating_a_scenario


Creating a Test Setup - Configure Connection for VMware View


In this section we will provide the VMware View Infrastructure details that would be used by Login VSI.


  1. From the Management Console home tab, click on Create Connection and then click on Start Connection Wizard.
  2. Select VMware View as connection type


  1. Use the default location for the View Agent path
C:\Program Files\VMware\VMware View\Client\bin\wswc.exe


  1. Provide the credentials which is used to login to View Manager Administrator portal. Yes, you have to type the password in plain text.


  1. In the next screen provide the IP/FQDN of the connection server. In Desktop name type the Linked Clone pool name.


  1. As per the inputs that have been provided, LoginVSI summarizes this in the following command. This is also the command that would be executed from each Launcher VM. To test the command you can execute the following command from a Launcher VM (you have to enter the details in plain text for e.g. server, username, password, domain).


"C:\Program Files\VMware\VMware View\Client\bin\wswc.exe" -serverURL {server} -username {username} -password {password} -domainName {domain} -desktopName pool_1 -standAlone -logInAsCurrentUser False –nonInteractive


IMPORTANT: Using the default LoginVSI options, Active Sessions won’t start. For Active Sessions to be initiated you have to add –unattended option to the above command line. Hence the revised command line would be


"C:\Program Files\VMware\VMware View\Client\bin\wswc.exe" -serverURL {server} -username {username} -password {password} -domainName {domain} -desktopName pool_1 -standAlone -logInAsCurrentUser False –nonInteractive

After creating a Test Scenario and Configuring Connection, you are now ready to start the test. I will discuss this in the next blog post and will post the link on @arunpande when the blog post is ready.