Wednesday, October 30, 2013

vStorage APIs for Array Integration (VAAI) & NetApp – How to set it right?


Welcome: To stay updated with all my Blog posts follow me on Twitter @arunpande !!

This blog provides steps and points to consider while using vSphere VAAI (block & file) with NetApp Storage. vSphere VAAI is used to offloaded certain tasks from the ESXi hosts to the underlying storage resulting in faster provision/deployment and improved performance of the ESXi hosts. To ensure that this configuration is setup correctly, consider the following steps:


Compatibility:
It’s important that the setup you are using is compatible i.e. the ONTAP version and the corresponding ESXi version support the VAAI primitives that you are going to use. To understand the compatibility between ONTAP and ESXi review the NetApp KB How to determine if VAAI features are being used in a vSphere and NetApp environment? (You need to register with http://support.netapp.com in order to view the KB)


In addition to the above NetApp KB also check VMware Compatibility Guide to confirm the compatibility of the Storage Array with the version of vSphere. Here is an example of how the supported VAAI primitives are reported


Enable VAAI on ESXi host:


Once you have confirmed that the VAAI primitives are supported by the ESXi and Storage Array (ONTAP) version you have to ensure that VAAI is enabled. For block level storage (FC/iSCSI) VAAI is enabled by default on the ESXi hosts. To confirm this use the following commands on the ESXi host


# esxcfg-advcfg -g /DataMover/HardwareAcceleratedMove Value of HardwareAcceleratedMove is 1
# esxcfg-advcfg -g /DataMover/HardwareAcceleratedInit Value of HardwareAcceleratedInit is 1
# esxcfg-advcfg -g /VMFS3/HardwareAcceleratedLocking Value of HardwareAcceleratedLocking is 1


From the above command we can identify the VAAI primitives for example HardwareAcceleratedMove corresponds to FULL Copy, HardwareAcceleratedInit corresponds to Block Zero & HardwareAcceleratedLocking corresponds to ATS.


To disable VAAI primitive use the following command for all primitives
# esxcfg-advcfg –s 0 /DataMover/HardwareAcceleratedMove Value of HardwareAcceleratedMove is 0


To enable VAAI primitive use the following command for all primitives
# esxcfg-advcfg –s 1 /DataMover/HardwareAcceleratedMove Value of HardwareAcceleratedMove is 0


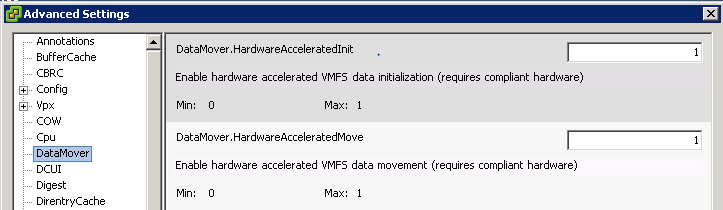
Alternatively you can also use GUI to enable VAAI on the ESXi host. For the ESXi host by navigating to Configuration > Advanced Setting under Software > Datamover and ensure that the values are 1 


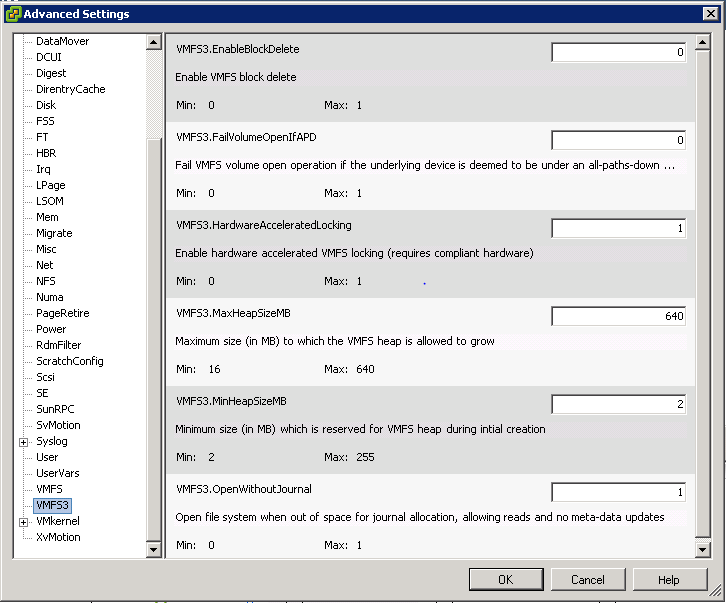
     For the third primitive you have to navigate to VMFS3


NOTE: VAAI is enabled by default for ESXi hosts and if you are going to use block level storage no additional changes are required on the ESXi host.


If you want to VAAI for NetApp NFS Storage then you need to install the NFS VAAI Plugin. To download the plugin navigate to http://support.netapp.com/ and click on Downloads > Software > NetApp NFS Plug-in for VMware VAAI > Select ESXi > Go


You can now download the NetAppNasPlugIn.v20.vib or NetAppNasPlugin.v20.zip. I chose to download NetAppNasPlugin.v20.vib and used the following command to install the VIB on the ESXi host.
# esxcli software vib install –d /vmfs/datastore/nfs_datastore/ NetAppNasPlugin.v20.vib


NOTE: If you are using NetApp Virtual Storage Console (VSC) you can also push the installation of the VIB on the ESXi hosts using VSC.


Enable VAAI on NetApp Storage:

VAAI is enabled by default in Data ONTAP for block storage. For NFS you have to use the following commands to enable vStorage.


Clustered Data ONTAP
vserver nfs modify –vserver vserver_name -vstorage enabled


7 Mode
options nfs.vstorage.enable on


Check VAAI settings


The datastores that are VAAI capable should have Hardware Acceleration status as Supported. If this is marked as Unknown then either few or none of the VAAI primitives are supported.


You may also check the hardware acceleration status from ESXi Shell using the following commands


Get the details about the LUN using the following command


~ # esxcli storage core device list -d naa.600a09802d6474573924384a79717958
naa.600a09802d6474573924384a79717958
  Display Name: NETAPP iSCSI Disk (naa.600a09802d6474573924384a79717958)
  Has Settable Display Name: true
  Size: 256280
  Device Type: Direct-Access
  Multipath Plugin: NMP
  Devfs Path: /vmfs/devices/disks/naa.600a09802d6474573924384a79717958
  Vendor: NETAPP
  Model: LUN C-Mode
  Revision: 8200
  SCSI Level: 4
  Is Pseudo: false
  Status: degraded
  Is RDM Capable: true
  Is Local: false
  Is Removable: false
  Is SSD: false
  Is Offline: false
  Is Perennially Reserved: false
  Queue Full Sample Size: 0
  Queue Full Threshold: 0
  Thin Provisioning Status: yes
  Attached Filters: VAAI_FILTER
  VAAI Status: supported
  Other UIDs: vml.0200040000600a09802d6474573924384a797179584c554e20432d
  Is Local SAS Device: false
  Is Boot USB Device: false
  No of outstanding IOs with competing worlds: 32


To get VAAI details about a specific LUN use the following command, you can now determine the VAAI primitives that are supported. Note that all VAAI primitives might not be supported for a specific ESXi and ONTAP.


~ # esxcli storage core  device vaai status get -d naa.600a09802d6474573924384a79717958
naa.600a09802d6474573924384a79717958
  VAAI Plugin Name: VMW_VAAIP_NETAPP
  ATS Status: supported
  Clone Status: supported
  Zero Status: supported
  Delete Status: supported

I will discuss more about the statistics in the next blog.


Wednesday, August 28, 2013

NetApp Cluster Mode vSIM – Install, Setup & Configure

NetApp Cluster Mode vSIM – Install, Setup & Configure

Welcome: To stay updated with all my Blog posts follow me on Twitter @arunpande !!
In my previous blog I have shared some tips to pass the NCDA certification, here I would like to share the installation & configuration procedure for installing ONTAP vSIM (simulator). If you are NetApp enthusiast and are looking forward to learn NetApp Storage fundaments and basic storage administration tasks this would be a good start. I have divided the blog into three sections:
  • Download & Install NetApp vSIM: This sections provides details about downloading the simulator
  • Initial Configuration: This section provides details about the initial setup tasks that have to be performed irrespective of 7 Mode or Clustered Data ONTAP.
  • Cluster Setup: This section provides steps about the initial setup of Clustered Data ONTAP.
Download & Install NetApp vSIM
  1. To download NetApp vSIM, logon to http://support.netapp.com/portal/download (use this site to download various NetApp software/firmware & tools) and navigate to Product Evaluations. To download the simulator you have to be NetApp Customer/Partner.


  1. Select Data ONTAP Simulator


  1. You will now see the list of ONTAP simulators that are available for download. Click on Simulator 8.x
  2. Select the specific version of ONTAP. For the purpose of this blog I am using ONTAP 8.2 Cluster Mode. Click on Clustered-ONTAP 8.2 to download the tgz file, ofcourse you have to read and accept the EULA fist.
     
  3. Once the file is downloaded, upload the .tgz file on the VMFS datastore were you want to provision the simulator. You can use WinSCP or Datastore Browser on the ESXi host to achieve this.


  1. Extract the files using the # tar xvf vsim_esx-cm.tgz command from the ESXi Shell using SSH, it will take few minutes for this task to complete. Here you would see multiple DataONTAP-s00*.vmdks because the virtual disk 4 is split into 2 GB files.


  1. In the next step use the DataONTAP.vmx file to register the simulator as a virtual machine in the ESXi host. Navigate to the VMFS Datastore and select the vsim_esx-cm folder, right click on the DataONTAP.vmx file and click on Add to inventory. Follow the onscreen instructions to complete this task.
  2. Understand the components of the simulator before we proceed further. We will discuss this in the next section while configuring the simulator. Once the registration is complete you can start with the initial configuration.
Initial Configuration
With this step you can now perform all the Data ONTAP functionalities. This will help you in understanding ONTAP better and the various features and functions that it provides.
  1. Power on the ONTAP simulator virtual machine. If you are using ESXi 5.1 the following error would be displayed while powering on the VM
  2. This error is reported because the vmkernel mulitextent module is no longer loaded by default and to fix this issue use command # vmkload_mod multiextent. For more information refer to VMware KB 2036572.
  1. After powering on the VM, open the virtual machine console and monitor the boot sequence. Try this few times to understand the boot process. To proceed further you have to press Ctrl+C to access the Boot Menu


  1. At the Boot Menu you have to press 4 to initialize all the disks. In this setup all the disk are zeroed and you have to follow the same step when you have disk shelves connected to the controller.
  2. At the following prompts press Y to confirm
  3. The wipeconfig task is initiated and you have to wait patiently for this task t complete.  Note that when you are working on actual NetApp Filers this task may take several minutes depending on the number of drives in the disk shelf and their size.
Cluster Setup
This step is specific to clustered Data ONTAP and in this example we are creating a data ONTAP cluster. After the wpieconfig task is completed the following screen is displayed. Note that you can exit this screen and start the cluster wizard later using cluster setup command.
 
Cluster Setup – Perquisites
  • Networking Details (IP Address, Subnet Mask, Default Gateway) for Cluster Management
  • Networking Details (IP Address, Subnet Mask, Default Gateway) for Node Management
  • DNS Information (Domain Name & DNS Server IP)


  1. Type “create” because we are creating a new cluster and say “no” for single node cluster. This will allow you to add another simulator in future when you want to test Storage Failover.
     
  2. Type “yes” to select the defaults for the network ports that would be used for Cluster Network. These ports would be used to exchange the cluster heart beats and won’t be used to send/receive data.
  3. You can also add additional network cards to the simulator using the edit setting option for the VM. Here you notice that by default four network cards are available where two network cards are used only for Cluster Network and the two are used for Data traffic.
     
  4. In the next step provide a cluster name and enter the base license key which is also available at the Simulator download page.
     
  5. You may choose to enter additional license keys or press enter to skip. I chose to skip this step and copy past all the license keys when I connect using Putty.
  6. Enter the cluster “admin” password. 
  7. Enter the networking details for your cluster management interface. This interface will allow you to manage the Storage Cluster and all the Storage nodes.
  8. Enter the DNS information. Ignore the SFO (Storage Failover) message at the moment because there is only single node in this cluster.
  9. Enter the location of the controller.
  10. Enter the networking details for the node management interface. Note that this interface would be used to manage only this specific storage node.
  11. Enable AutoSupport when you are using NetApp Storage Filers for this simulator you may ignore this option.
     
  12. This completes the cluster setup and its now ready to use.
In my next blog I will discuss about some basic administration tasks that are performed on NetApp Unified Storage systems.

Thursday, July 11, 2013

Passed !! Data ONTAP Cluster-Mode Administrator (NS0-156) certification

Welcome: To stay updated with all my Blog posts follow me on Twitter @arunpande !!
 
I have recently joined NetApp as Technical Marketing Engineer a.k.a. Reference Architect for VMware Solutions. At NetApp I work for the Solutions Integration team and my primary role is to develop deployment and integration guides, solutions and reference architectures, technical collateral using best practices for VMware solutions on NetApp. I also conduct customer presentations and help them optimize their datacenter solutions using NetApp & VMware. With a strong VMware background I had to now improve my storage skills specifically on NetApp. Hence I set this goal of completing NCDA certification within the first six months at NetApp. I am glad that I was able to do this within first four months.


Through this blog I would also like to share the following tips which helped me clearing this certification: 

Understanding NCDA Certification:
The following NCDA certifications are available:
·         NS0-155 Data ONTAP 7-Mode Administrator
·         NS0-156 Clustered Data ONTAP Administrator

Training:
Use the above link to get the list of recommended training for NCDA certification. Apart from Clustered Data ONTAP Administration all other courses are FREE and all you need to do is STUDY!! 

Lab:
I highly recommend using NetApp VSIM for ESXi or Workstation to understand Data ONTAP better. ONTAP Simulator is available for download at http://support.netapp.com/NOW/download/tools/simulator/ontap/8.X/ (both 7-Mode and Clustered-ONTAP).

Help:
If you need any technical assistance, reach out to https://communities.netapp.com/