Wednesday, November 27, 2013

esxtop Statistics for Block VAAI

Welcome: To stay updated with all my Blog posts follow me on Twitter @arunpande !!
 
We all know how important esxtop is while troubleshooting various vSphere related issues. In this blog I will share the esxtop metrics that you can use while troubleshooting various VAAI primitives. This will help you not only to diagnose VAAI related issues but will also help you measure the performance benefits that VAAI provides.  
To demonstrate this I have replicated some scenarios where VAAI is used so that I can capture the esxtop stats.
To access the esxtop metrics, login to the ESXi host using SSH
# esxtop
# press u for disk view
# press f to change fields
# press o for VAAI stats
# press p for VAAI latency stats
# press Enter

Block Zero & Hardware Assisted Locking (ATS)


In this section we will cover the Block Zero VAAI primitive.
Scenario 1: Test BLOCK ZEROING primitive by creating a new Windows 2008 R2 VM with Lazy Zeroed Thick disk.
 
On monitoring the ZERO statistics I observed that it incremented from 4 to 7007 during the OS reinstallation.


Scenario 2: Test BLOCK ZEROING primitive by adding a new Eager Zeroed Thick virtual disk.
In this scenario I have added a 150 GB Eager Zeroed thick disk and on monitoring esxtop I observed that the ZERO statistics incremented from 7013 to 148020.


UNMAP

Scenario 3: You can either delete a VM or Storage vMotion the VM to a different datastore to demonstrate this.
We will now use the UNMAP primitive from the ESXi shell using the command
# esxcli storage vmfs unmap -l iscsi_2


On monitoring the esxtop I have observed that the DELETE statistics has increased to 52527.

Full Copy

In this section we will cover the Full Copy VAAI primitive.


Scenario 4: Test VAAI FULL COPY primitive, create multiple clones of the same VM.


In this scenario we will initiate a clone of a Windows 2008 R2 VM from vCenter. While monitoring the esxtop I have observed that the CLONE_RD & CLONE_WR statistics incremented. Note that MBC_RD/s & MBC_WR/s is the throughput for Full Copy Read & Write.


Scenario 5: Test VAAI FULL COPY primitive by relocating VM using Storage vMotion.


In this scenario we have migrated the windows VM to another iSCSI LUN that is being managed by the same controller in the same vServer. While monitoring esxtop I have observed that the CLONE_RD (source datasource), CLONE_WR (destination datastore), ATS, ZERO (destination datastore), AAVG (destination datastore) metrics were incremented.


To all VMware & NetApp Administrators go prepared when you walk into the War Room to discuss VAAI related (break/fix & performance) issues, all the best .

Wednesday, November 20, 2013

Using VAAI UNMAP on vSphere 5.5 & NetApp Storage

Welcome: To stay updated with all my Blog posts follow me on Twitter @arunpande !!


In my previous blog vStorage APIs for Array Integration (VAAI) & NetApp – How to set it right? I have shared steps to use VAAI. In this blog I will cover the steps required to use the VAAI UNMAP primitive in vSphere 5.5. The UNMAP primitive is used by the ESXi host to update the Storage Array about the storage blocks that has to be reclaimed after deleting a VM or migrating it to another datastore using Storage vMotion. In vSphere 5.5 # esxcli storage vmfs unmap command is used whereas in the earlier version vmkfstools –y command was used. You can now specify the number of blocks to be reclaimed using -n option whereas with vmkfstools –y command you had to specify the percentage of blocks that you want to reclaim. It is advised to perform this step after business hours or when there is no active I/O on the datastore, however I have not tested


In this scenario I am using a thin provisioned LUN from NetApp Storage and to demonstrate space reclamation I will create two scenarios (i) deleting the thick disk  (ii) migrating VMs using Storage vMotion. I will also share the storage capacity from NetApp Virtual Storage Console (VSC) which will give a view about the available space not only on the VMFS datastore but also the underlying LUN/Volume/Aggregate.


Scenario 1 – Deleting a thick disk from the virtual machine
Here is an overview about the Capacity of Datastore/LUN/Volume/Aggregate as per VSC.


Capacity of the datastore as per ESXi Shell


# du -h /vmfs/volumes/iscsi_2/
1.0M    /vmfs/volumes/iscsi_2/.sdd.sf
8.0K    /vmfs/volumes/iscsi_2/ntap_rcu1374646447227
8.0K    /vmfs/volumes/iscsi_2/ntap_rcu1374459789333
8.0K    /vmfs/volumes/iscsi_2/.naa.600a09802d6474573924384a79717958
194.1G  /vmfs/volumes/iscsi_2/Win2k8-1
194.9G  /vmfs/volumes/iscsi_2/


This indicates that the total used capacity on the datastore is 194.9 GB
We will now delete the 150 GB Eager Zeroed Thick Disk. After deleting this virtual disk the ESXi shell reports the following capacity.


# du -h
1.0M    ./.sdd.sf
8.0K    ./ntap_rcu1374646447227
8.0K    ./ntap_rcu1374459789333
8.0K    ./.naa.600a09802d6474573924384a79717958
44.1G   ./Win2k8-1
44.9G   .


The free space on the datastore is now 205 GB and the used space is approximately 44.9 GB.  However NetApp Storage does not detect this free space on the LUN, here is the output of the lun show command that is executed from the Clustered Data ONTAP CLI.


clus-1::> lun show -v /vol/iscsi_2/iscsi_2
              Vserver Name: vmwaretest
                  LUN Path: /vol/iscsi_2/iscsi_2
               Volume Name: iscsi_2
                Qtree Name: ""
                  LUN Name: iscsi_2
                  LUN Size: 250.3GB
                   OS Type: vmware
         Space Reservation: disabled
             Serial Number: -dtW9$8JyqyX
                   Comment: The Provisioning and Cloning capability created this lun at the request of Administrator
Space Reservations Honored: false
          Space Allocation: enabled
                     State: online
                  LUN UUID: 7fe6d24a-f782-476d-827e-a4d20f371abb
                    Mapped: mapped
                Block Size: 512
          Device Legacy ID: -
          Device Binary ID: -
            Device Text ID: -
                 Read Only: false
Inaccessible Due to Restore: false
                 Used Size: 237.9GB
       Maximum Resize Size: 2.50TB
             Creation Time: 12/16/2010 03:27:26
                     Class: regular
                     Clone: false
  Clone Autodelete Enabled: false
          QoS Policy Group: -


VSC also reports the same capacity for this LUN.


We will now use the UNMAP primitive from the ESXi shell using the command
# esxcli storage vmfs unmap -l iscsi_2


NOTE: You can also specify the number of blocks that you want to reclaim using –n option. If you specify 500 then 500 x 1MB (i.e. default block size in VMFS 5) blocks would be reclaimed.


On monitoring the esxtop I have observed that the DELETE statistics has increased to 52527.


VSC now reports the following capacity, where we see that the free space is now updated for LUN & Volume.


Scenario 2 – Test UNMAP after relocating VMs using Storage vMotion.


NetApp VSC reports the following storage usage.
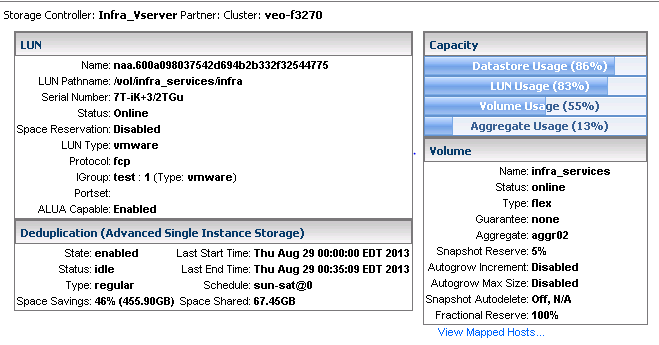


Datastore Usage according to ESXi Shell


~ # df -h
Filesystem   Size   Used Available Use% Mounted on
VMFS-5       1.0T 881.5G    143.0G  86% /vmfs/volumes/FC-Infra


Datastore Usage per VM is given below


~ # du -h /vmfs/volumes/FC-Infra /
74.5G   /vmfs/volumes/FC-Infra/VC
78.3G   /vmfs/volumes/FC-Infra/DB
15.4G   /vmfs/volumes/FC-Infra/Oncommand-Proxy
8.0K    /vmfs/volumes/FC-Infra/.vSphere-HA
1.3M    /vmfs/volumes/FC-Infra/.dvsData/7a 4c 23 50 26 82 38 5d-d9 e5 e2 78 4f 7d af 26
32.0K   /vmfs/volumes/FC-Infra/.dvsData/3e 55 23 50 21 27 03 84-e3 f4 4a 7f de 48 08 32
1.3M    /vmfs/volumes/FC-Infra/.dvsData
29.4G   /vmfs/volumes/FC-Infra/AD
64.1G   /vmfs/volumes/FC-Infra/VASA
23.5G   /vmfs/volumes/FC-Infra/VSI Launcher-9
23.5G   /vmfs/volumes/FC-Infra/VSI Launcher-7
12.0G   /vmfs/volumes/FC-Infra/OnCommand Balance
32.7G   /vmfs/volumes/FC-Infra/ViewComposer
63.3G   /vmfs/volumes/FC-Infra/View Connection Server
19.5G   /vmfs/volumes/FC-Infra/VSIShare
19.5G   /vmfs/volumes/FC-Infra/VSI Launcher-10
21.4G   /vmfs/volumes/FC-Infra/UM-6.0
20.6G   /vmfs/volumes/FC-Infra/VSI Launcher
15.3G   /vmfs/volumes/FC-Infra/VSI Launcher-Template
24.4G   /vmfs/volumes/FC-Infra/VSI Launcher-2
23.5G   /vmfs/volumes/FC-Infra/VSI Launcher-4
24.7G   /vmfs/volumes/FC-Infra/VSI Launcher-3
23.5G   /vmfs/volumes/FC-Infra/VSI Launcher-5
25.5G   /vmfs/volumes/FC-Infra/VSI Launcher-6
25.5G   /vmfs/volumes/FC-Infra/VSI Launcher-8
34.4G   /vmfs/volumes/FC-Infra/UI VM
181.5G  /vmfs/volumes/FC-Infra/Analytics VM
1.5G    /vmfs/volumes/FC-Infra/vmkdump
881.3G  /vmfs/volumes/FC-Infra/


To make some free space on the Storage I have Storage vMotioned the following VMs to another datastore.
29.4G   /vmfs/volumes/FC-Infra/AD
78.3G   /vmfs/volumes/FC-Infra/DB


After the above VMs were migrated to other datastores the following datastore usage was reported:


From the Filer, notice that the LUN Used Size remains the same.


veo-f3270::> lun show -v /vol/infra_services/infra


             Vserver Name: Infra_Vserver
                 LUN Path: /vol/infra_services/infra
              Volume Name: infra_services
               Qtree Name: ""
                 LUN Name: infra
                 LUN Size: 1TB
                  OS Type: vmware
        Space Reservation: disabled
            Serial Number: 7T-iK+3/2TGu
                  Comment:
Space Reservations Honored: false
         Space Allocation: disabled
                    State: online
                 LUN UUID: ceaf5e6e-5a6a-11dc-8751-123478563412
                   Mapped: mapped
               Block Size: 512B
         Device Legacy ID: -
         Device Binary ID: -
           Device Text ID: -
                Read Only: false
                Used Size: 848.9GB
            Creation Time: 9/3/2007 18:12:49


NetApp VSC does not report any changes in LUN Usage either.
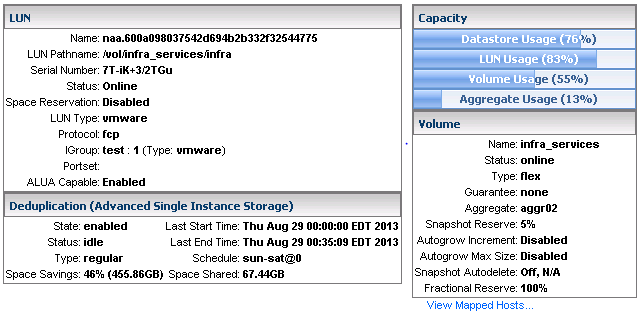


ESXi Shell reports the updated free space.
~ # df -h
Filesystem   Size   Used Available Use% Mounted on
VMFS-5       1.0T 773.8G    250.7G  76% /vmfs/volumes/FC-Infra


I have now performed the reclaim operation from the ESXi Shell using the below command
# esxcli storage vmfs unmap -l FC-Infra


NOTE: You can also specify the number of blocks that you want to reclaim using –n option. If you specify 500 then 500 x 1MB (i.e. default block size in VMFS 5) blocks would be reclaimed.

VSC now reports free space in the LUN Usage.
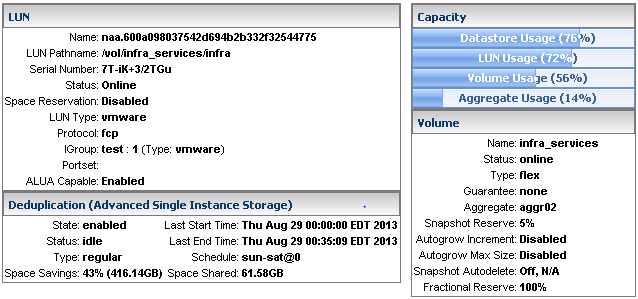


The filer also reports the updated Storage Capacity.
veo-f3270::> lun show -v /vol/infra_services/infra


             Vserver Name: Infra_Vserver
                 LUN Path: /vol/infra_services/infra
              Volume Name: infra_services
               Qtree Name: ""
                 LUN Name: infra
                 LUN Size: 1TB
                  OS Type: vmware
        Space Reservation: disabled
            Serial Number: 7T-iK+3/2TGu
                  Comment:
Space Reservations Honored: false
         Space Allocation: disabled
                    State: online
                 LUN UUID: ceaf5e6e-5a6a-11dc-8751-123478563412
                   Mapped: mapped
               Block Size: 512B
         Device Legacy ID: -
         Device Binary ID: -
           Device Text ID: -
                Read Only: false
                Used Size: 742.6GB
            Creation Time: 9/3/2007 18:12:49

Wednesday, November 6, 2013

Create a custom ESXi ISO for NetApp NAS Plugin using PowerCLI and SAVE TIME !!

Welcome: To stay updated with all my Blog posts follow me on Twitter @arunpande !!


In my previous blog “vStorage APIs for Array Integration (VAAI) & NetApp – How to set it right?” I shared some pre-checks you should consider before using vStorage APIs and NetApp storage. I have highlighted about NFS VAAI Pluing that is required to be installed on the ESXi hosts if you want to leverage NFS VAAI and NetApp NFS Storage. This can be an additional implementation task and would require significant efforts if you are you are a cloud service provider or have a large infrastructure with 100s of ESXi hosts.
To address this you can create custom ESXi ISO with the NFS VAAI Plugin. In this blog I will discuss how you can create a custom ESXi ISO in easy steps using VMware PowerCLI. NOTE: There are few GUI based products which allows you to do the same task however their installation may not be permitted in organizations with strict compliance and policies. Hence I chose to use VMware PowerCLI to do this.
To create the custom ISO you need to download the following components:
  • VMware PowerCLI
  • VMware Offline Bundle: Download the offline bundle from vmware for the version of ESXi that you want to install. In the screenshot below I am downloading the offline bundle for vSphere 5.1 however in the example I am using ESXi 5.1 Update 1.


Once VMware PowerCLI is installed, launch PowerCLI (I am not covering about setting execution policy while using PowerCLI in this blog). In this scenario I am creating a custom ESXi 5.1 Update 1 ISO with NetApp NASPlugin version 18.
  1. Add the offline bundle to the software depot
PowerCLI C:> Add-EsxSoftwareDepot -DepotUrl C:\ESXi\update-from-esxi5.1-5.1_update01.zip
Depot Url
---------
zip:C:\ESXi\update-from-esxi5.1-5.1_update01.zip?index.xml


  1. List the different image profiles that are now available.
PowerCLI C:> Get-EsxImageProfile | Format-Table -AutoSize
Name                             Vendor       Last Modified        Acceptance Level
----                             ------       -------------        ------------
ESXi-5.1.0-20130402001-no-tools  VMware, Inc. 3/23/2013 9:30:37 PM PartnerSu...
ESXi-5.1.0-20130401001s-no-tools VMware, Inc. 3/23/2013 9:30:37 PM PartnerSu...
ESXi-5.1.0-20130402001-standard  VMware, Inc. 3/23/2013 9:30:37 PM PartnerSu...
ESXi-5.1.0-20130401001s-standard VMware, Inc. 3/23/2013 9:30:37 PM PartnerSu...


  1. Use one of the existing image profiles to create a clone of a new image profile that we will use to customize with the NetApp NASPlugin.
PowerCLI C:> New-EsxImageProfile -CloneProfile ESXi-5.1.0-20130402001-standard -Name ESXi-NFSVAAI -Vendor NetApp
Name                           Vendor          Last Modified   Acceptance Level
----                           ------          -------------   ----------------
ESXi-NFSVAAI                   NetApp          3/23/2013 9:... PartnerSupported


  1. Add the NetApp NAS Plugin to the software depot
PowerCLI C:> Add-EsxSoftwareDepot -DepotUrl C:\ESXi\NetAppNasPlugin.v18.zip
Depot Url
---------
zip:C:\ESXi\NetAppNasPlugin.v18.zip?index.xml


  1. List the NetApp NAS Plugin
PowerCLI C:> Get-EsxSoftwarePackage | Where-Object {$_.name -match "Netapp"}
Name                     Version                        Vendor     Creation Date
----                     -------                        ------     ------------
NetAppNasPlugin          1.0-018                        NetApp     4/29/2012...


  1. Add the NetApp NAS Plugin to the cloned Image profile
PowerCLI C:> Add-EsxSoftwarePackage -ImageProfile ESXi-NFSVAAI -SoftwarePackage NetAppNasPlugin
Name                           Vendor          Last Modified   Acceptance Level
----                           ------          -------------   ----------------
ESXi-NFSVAAI                   NetApp          9/13/2013 2:... PartnerSupported


  1. Export the Image profile as an ISO image
PowerCLI C:> Export-EsxImageProfile -ImageProfile ESXi-NFSVAAI -ExportToISO -filepath C:\ISO\ESXi5.1-NFSVAAIv18.iso

I personally felt that it’s easy to use PowerCLI and will continue to use PowerCLI in future, leave a comment if you have a different opinion.